
How to Troubleshoot Common 3D Printing Problems
Troubleshooting Common 3D Printing Problems
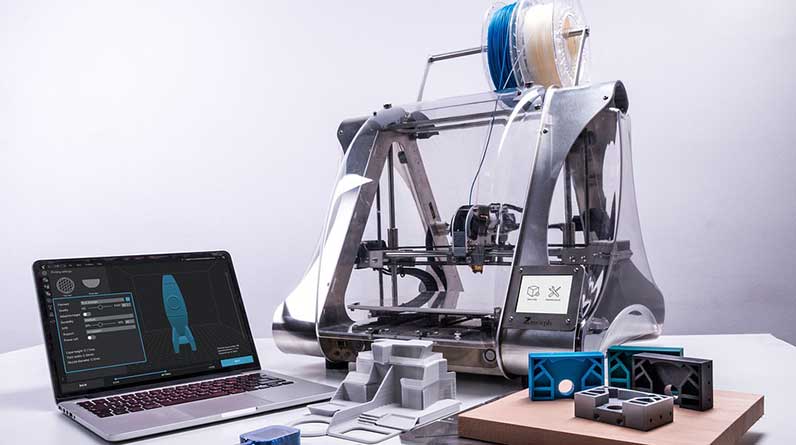
Many 3D printer owners face problems when they try to get the best results. Whether it’s due to the wrong settings, inappropriate cooling, or a faulty model, these issues can be frustrating and even cost you time and money.
However, there are some things that you can do to troubleshoot some of the most common issues. Hopefully, this guide will help you find the solution you’re looking for!
Layer Adhesion Issues
Layer Adhesion Issues occur when the layers of a 3D print do not bond well enough, leading to cracks or splits in the finished part. It is important to know how this occurs and what to do to resolve it so that your prints can be as smooth and professional looking as possible.
- 【250mm/s High-speed Printing Ender】The Creality Ender 3D printer Refines motion system with a standalone motor at each X/Y/Z axis for up to 2000mm/s² acceleration, and a steel transmission shaft that connects and syncs the Y-axis belts. The medal 3D printer alve the printing time and boosts efficiency
- 【Clog-free Direct Extrusion at 300℃】The “Sprite” dual-gear direct extruder of the Creality Ender-5 s1 3d printers deliver a strong 80N extrusion force. The hotend features a titanium heatbreak blocking heat creep, a corrugated heatsink for rapid cooling, and a 50mm³ large melting chamber to fully melt the filament. It can print PLA, TPU, PETG, ABS, and more, clog-freely for 1,000 hours
- 【Stable Frame Underpins Quality】An all-metal cube frame goes with the classic Cartesian structure. The stability is enhanced by thick linear shafts, extra gussets, two cantilevers, and silicone bed mounts. It ensures a 100% success rate for 1,000h printing at 250mm/s
- 【Auto-leveling and Smart Sensors】The CR Touch probe realizes fully-automatic precise 16-point bed leveling. The Z-offset can be adjusted at 0.05 accuracy with touch control. It also has a filament runout sensor and power loss recovery to factor in accidental moments. It is a tool to always count on
- 【Sticky and Bendable PC Build Surface】The PC spring steel sheet has two notches and a magnetic base for quick installation. The frosted PC surface is sticky to models. After printing, the model can be removed right away with a slight bend
Last update on 2026-06-25 / Affiliate links / Images from Amazon Product Advertising API
One of the most common causes of this problem is that your printer is printing too quickly. If your print speed is too high, the extruded plastic will not have time to bond to the previous layer. Fortunately, lowering your print speed to 5mm/s or 10mm/s increments can help resolve this issue.
Another common cause of poor layer adhesion is that your hot end is not heating up the filament adequately. If the filament is not heated to the temperature recommended by the manufacturer, the successive layers will not bond with each other and the final part may break.
You can easily test this by adjusting the print temperature until the part bonds to the previous layer. This can be done in 5-10degC increments until you find the ideal temperature.
Alternatively, you can print the same model at different speeds to see how each affects the final result. This will allow you to pinpoint the optimum printing speed for your specific setup and ensure that each part bonds properly.
Many popular slicers include tools to help you improve your layer adhesion. These tools include rafts and brims that help the print adhere to the bed. These are especially useful for making the first layer of your print more adherent to the surface of the print bed.
When printing with PLA, you should always make sure that your first layer is as uniform and smooth as possible. Rough first layers can often be solved by ensuring that the nozzle is set correctly for the height of the build plate and that it is leveled.
If the nozzle is too close to the build plate, it can catch on the previously deposited material and create unsightly mounds and peaks that can ruin the look of your first layer. This is especially the case if the build plate is not flat, but a simple adjustment can correct this.
Under-Extrusion
Under-Extrusion is one of the most common 3D printing problems and is usually caused by a number of factors. Luckily, there are several things you can do to troubleshoot this issue and get back to making awesome prints!
First, you’ll want to make sure your nozzle is clean and free of any clogs. This is easily accomplished by using a brush to remove any dirt or debris on the nozzle.
Second, you’ll need to check that your printer is heating the material at the proper temperature. Too low or too high a temperature can cause a variety of issues, including under-extrusion.
Third, you’ll need to make sure the filament you’re using is of good quality. If you’re printing with a low-quality filament, the extruder will struggle to push the material through the nozzle.
Another potential problem is that your filament may not have the correct diameter. This can happen when you’re using a spool that’s too small for your printer, or if your slicer doesn’t support the right diameter of your filament.
If this is the case, you’ll need to re-spool the material or purchase a new spool from a different brand. Both of these actions will allow you to ensure the material is of a quality that’s compatible with your printer.
Additionally, you’ll want to make sure that the material’s density is correct. If the material is too thick, it will block the nozzle and cause under-extrusion.
Finally, you’ll need to make sure that your retraction settings are set properly. Retraction allows the printhead to pull back a bit of the filament before it travels, which can help prevent oozing and stringing. Retraction can also help reduce the amount of material that gets left behind during the printing process, which can result in under-extrusion.
If you’re still having issues with under-extrusion, you can try increasing the flow rate of your slicer (also known as the extrusion multiplier). This will force more filament through the nozzle, so you’ll see more extruded material.
- 【Faster printing】Fully industrial-grade structure, using the second-generation Qidi dual Z-axis structure, all of the original motion structure is upgraded to linear guides, with the high temp extruder, the filament extruding is faster and smoother, the printing accuracy is higher .The printing speed is increased by 20%, it is set to print easily at 100cc per hour.
- 【Freedom in the choice of the filament】 Qidi iFast can print almost all kinds of filaments which suitable for FDM 3D printers on the market, such as PLA ,PLA+ ,ABS ,PETG, NYLON,etc. The iFast 3d printer equipped with a heated chamber, which can be heated to 60°C. The excellent mechanical structure can produce more robust manufacturing-grade parts.
- 【Freedom in manufacturing of the complex parts】 Qidi iFast is equipped with automatic dual extruder, which can automatically adjust the left and right extruder up and down according to the software. With the PVA (water-soluble) support, it is very suitable for printing manufacturing-level parts with complex structures and realizing precision manufacturing.
- 【All metal high temp extruder】 Compared with the normal brass nozzles which on the market, it is more durable and prints smoother. The iFast 3d printer is pre-installed with dual extruder, and the print size is 330×250×320mm.
- 【Excellent user experience, large UI interface】It’s equipped with self-developed QIDI slicing software, two modes can be selected: normal mode and expert mode. The normal mode is suitable for novices, the parameter system has been intelligently set, no other operations are required, it is very simple. Expert mode is suitable for experienced users, who can deeply participate in modifying parameters and personalized printing models.
Last update on 2026-06-25 / Affiliate links / Images from Amazon Product Advertising API
Over-Extrusion
Over-extrusion is one of the most common 3D printing issues and can be caused by a number of different factors. This can range from thermoplastic filament settings and print temperature to flow rate parameters.
It can also be caused by a number of hardware defects. This can include a worn-out nozzle or improperly calibrated extruder steps.
Fortunately, there are a few simple things you can do to troubleshoot over-extrusion. For instance, you can lower your printing temperature in 5-10degC increments or you can tweak your extruder step settings to reduce over-extrusion.
Another way to fix over-extrusion is to make sure you are using the right size of filament for your printer. There are a few standard diameters of filament on the market, including 1.75mm, 2.85mm, and 3mm. If you slice your model considering a larger diameter of filament than the actual size, you will get over-extrusion.
Once you have determined the correct size of filament, it’s important to calibrate your flow rate with it. This can be done by measuring your model’s wall thickness and calculating the flow rate of the resulting layer.
This can be a difficult task for many printer owners, but it is incredibly important. Ultimately, it is the best way to ensure accurate prints without any over-extrusion.
If you are experiencing over-extrusion, you may need to adjust your flow rate settings in Cura or Simplify3D. The flow rate setting is a multiplier that determines the amount of filament that your printer pushes out.
The multiplier value should normally be about.95 for PLA and a little higher for ABS. You can check the current value of your flow rate in Cura or Simplify3D by clicking on the Flow tab.
Alternatively, you can use a pair of calipers to measure your filament’s diameter and manually lower the flow rate. This will make the printer adjust to a more accurate range of flow rates.
Over-extrusion can be a frustrating issue that can lead to poor-quality prints. It can also ruin the outer dimensions of your finished print, causing it to look warped or uneven.
3D Ghosting
3D printer ghosting is an issue that can occur in 3D printing when two or more layers of the same material are printed on top of each other. It is caused by a jump in the Z-axis of the 3D printer, resulting in the same layer being printed multiple times. This can lead to a blurred or ghosted look on the printed object.
You can help resolve this problem by turning off unnecessary devices or programs running on your computer. This will lower the temperature on your machine and allow it to refresh faster. If this doesn’t solve the issue, try disabling some other things that can slow down your computer’s response time and refresh rate, such as noise reduction or motion smoothing.
In conclusion, 3D printing can be a very rewarding and enjoyable experience. However, it can also be plagued with common problems like layer adhesion, under-extrusion, over-extrusion, and ghosting. By understanding how each problem occurs, you can better troubleshoot it and get back to making awesome prints.


