Doing Your Own Electrical Repairs
Home Electrical Repair
Do you know how to DIY electrical repair at home? If not, that’s okay.
Not everyone has the natural inclination to understand how circuits work or what voltage means.
What’s more challenging is having the confidence to fix something when it breaks in your own home. However, electrical repairs don’t need to be that difficult if you have the right attitude and guidance from experienced professionals.
It is a scary proposition for most people; after all, electrocution risks could be involved if you do not know what you are doing.
Before we delve into the basics of electrical repair, it’s important to emphasize that working with electricity can be dangerous if not done properly.
Consult with a professional electrician if unsure about a project or task. For those who feel confident and equipped, here are some guidelines to get started.
Basic Tips for Safety
- Always turn off the power at the circuit breaker before beginning any electrical work.
- Use insulated tools to protect yourself from electric shock.
- Never touch water when you are in contact with electricity.
- Always wear rubber-soled shoes and gloves for extra protection.
Necessary Tools
For basic electrical tasks, it’s useful to have the following:
- Screwdrivers
- Wire strippers
- Voltage tester
- Needle-nose pliers
- Cable cutters
- Insulation tape
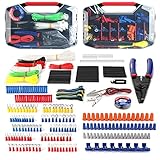
- Assorted 582 electrical wire terminals and other accessories with transparent box for easy access
- Easy and convenient to use for wire connecting usage by this complete set and wire cutter stripper included
- Wide application for electrical insulation, wire bundling, color coding, mechanical protection, wire/cable joints and repairs, etc.
- All the terminals, connectors and shrink tubes are certificated by UL
- Includes ring terminals, spade terminals, butt connectors, male and female quick-connects
Last update on 2026-07-12 / Affiliate links / Images from Amazon Product Advertising API
Common Electrical Repairs
Below are some common electrical repairs you may be able to handle on your own:
- Replacing a Light Fixture: This involves disconnecting the old fixture and installing a new one in its place. It’s usually as simple as unscrewing the old fixture, disconnecting the wires, connecting the new fixture’s wires similarly, and screwing it into place.
- Changing Outlets or Switches: Just like replacing a light fixture, you’ll need to unscrew the old outlet or switch from the wall, disconnect the wires (note where each wire was connected), connect wires to your new outlet or switch in the same manner they were originally arranged on your previous device then screw it back into place.
- Repairing Damaged Cords: Frayed cords can be hazardous; however, they can often be repaired by cutting away damaged portions and reattaching undamaged wire ends using wire connectors.
Remember, safety should always come first when dealing with electricity.
Ensure that you understand what you’re doing before proceeding with any project.
However complex these tasks may seem at first glance, once broken down into manageable steps, most people find they can do basic home electrical repairs themselves!
But again: when in doubt – call an expert!
Repair Breakers and Fuses
Breakers and fuses are the first line of defense when you have an electrical problem in your home.
They are designed to help protect your home’s wiring and circuit breakers by tripping when there is an overload or short circuit in the system.
If you hear a popping sound coming from an area where you have an electrical issue, you should investigate if you have a blown breaker or fuse.
Ideally, you should have a professional come out to assess any issues and repair or replace any blown breakers/fuses.
There are times when you can fix a bad breaker or fuse yourself.
Repairing breakers and fuses is an intricate process that must be handled cautiously. Here’s a general guide to give you a rough idea about how it can be done:
NOTE: If you’re not comfortable dealing with electricity, hiring a professional electrician is highly recommended.
Repairing Breakers
- First, turn off the main power switch on your electrical service panel.
- Remove the panel cover to access the circuit breakers.
- Identify the faulty breaker (generally, it will be in the “off” position or middle ground between “on” and “off”).
- Carefully remove this breaker by pulling it from its socket.
- Replace it with a new one that has the same current rating.
- Reattach the panel cover and turn back on the main power switch.
Replacing Fuses
- Again, begin by turning off the main power supply.
- Locate your fuse box and identify the blown fuse (it usually has a darkened window).
- Carefully remove this fuse by unscrewing it from its socket.
- Replace it with a new one that has an identical amperage rating.
- Screw in the new fuse securely but do not overtighten.
- Turn back on your main power supply.
Remember, safety comes first! Always wear appropriate gear when handling electrical equipment, including insulated gloves and safety goggles.
Also, consider local electrical codes and regulations – improper handling can lead to serious accidents or legal issues.

- CLEAR LCD READOUT: GFCI Receptacle Tester features a large backlit LCD readout for easy voltage reading and clear indication of wiring conditions
- TRIP TIME DISPLAY: LCD readout shows the time required to trip a GFCI device, allowing for quick and accurate troubleshooting
- DETECT COMMON WIRING FAULTS: Detect and identify common wiring faults, ensuring electrical safety and proper functionality of GFCI receptacles
- PATENT-PENDING OPEN NEUTRAL & OPEN GROUND DETECTION: Innovative detection system identifies Open Neutral and Open Ground wiring faults, enhancing safety measures
- CONVENIENT AUTO-HOLD FEATURE: Auto-Hold function holds the reading for hard-to-reach outlets, providing convenience and ease of use
Last update on 2026-07-12 / Affiliate links / Images from Amazon Product Advertising API
Check Your Wiring
One of the first things you should do when you notice electrical problems in your home is to check your wiring.
Doing so can help you identify where the problem might be and help you get an idea of what repairs you will need to do.
If you notice any of the following issues with your wiring, you should contact a professional to do electrical repairs.
- Loose or cracked wires – This is usually the result of someone trying to fish the wires through the wall, which can cause fraying. Loose wires should be cut off and reattached with a wire connector.
- Old or damaged wire insulation is the covering around the wires, and it is important to protect them. If the insulation is worn or torn, it needs to be replaced.
- Broken or missing wall plates – This is the covering on the outlet that protects the wiring. If it has been damaged or is missing, it needs to be replaced.
Change Out Switches and Light Fixtures
One of the most common electrical repairs homeowners must do is changing out light fixtures or switches. Each of these repairs is easy, but you must turn off the power to the area where you are working.
One of the things you will have to consider when changing out light fixtures or light switches is whether you are replacing them with something of the same voltage.
The voltage that the fixtures should be rated for will depend on the wiring and where the fixtures are being installed.
Materials Needed:
- New switch or light fixture
- Screwdriver
- Wire strippers
- Voltage tester
Changing Out Switches:
- Turn off the power at your electrical panel to avoid any accidents.
- Remove the switch cover with your screwdriver.
- Test for voltage using your voltage tester to ensure the power is off.
- Uninstall the old switch by unscrewing it from its box and disconnecting the wires.
- Connect the wires to your new switch (usually, black wires connect to brass screws, white wires to silver screws).
- Screw in your new switch and replace the cover.
Changing Out Light Fixtures:
- Turn off the circuit breaker that powers the light fixture you want to change.
- Remove the old fixture by unscrewing it while supporting its full weight.
- Disconnect all wiring between the fixture and household wiring.
- Connect your new fixture’s wire with existing household wires (once again, usually black with black or red, white with white).
- Carefully push connections into the junction box and mount your new fixture.
Remember, when working with electricity, safety is paramount. Hence, if you feel uncomfortable doing this yourself or if anything seems amiss during installation, contact a professional electrician immediately.
Before starting any DIY project involving electricity, remember that regulations vary depending on where you live, so double-check what is permitted in your area before beginning work.
Always take care when dealing with electrical appliances and installations; safety first!
Fix Broken Light Switch Covers
Another common electrical repair is to fix broken light switch covers.
This easy fix can be done in a couple of minutes. You will need a screwdriver and a new light switch plate.
You will first need to turn off the power to the light switch and remove the broken light switch plate. Next, you will install the new plate to ensure it is flush against the wall, and use a screwdriver to set the screw into the wiring box to secure the plate.

- 28-Piece Tool Kit with high quality commonly used hand tools for the professional or apprentice
- Tool Kit includes: 4 types of pliers, 6 screwdrivers, 7 nut drivers, hex key set, torpedo level, crimper/cutting tool, wire stripper/cutter
- Kit also includes: NCVT with flashlight, GFCI tester, utility knife, tape measure, canvas zipper bag, tool bag backpack, and protective eyewear
- 39-Pocket Tradesman Pro Tool Bag Backpack (Cat. No. 55421BP-14) features a hard, molded front pocket for safety glasses and the Canvas Zipper Bag (Cat. No. 5139) is made of No. 10 canvas
- 4 Pliers: 8-Inch Heavy-Duty Long Nose Side-Cutters, 9-Inch Pliers with Fish Tape Puller, 8-Inch Diagonal-Cutters with Angled Head, 10-Inch Pump Pliers (Cat. Nos. D203-8, D213-9NETP, D248-8, D502-10)
Last update on 2026-07-12 / Affiliate links / Images from Amazon Product Advertising API
Checking for Loose Wiring
If you have an issue with your electrical system and notice that the lights flicker when you use the appliances on that circuit, there could be a loose connection in the wiring.
This can be difficult to diagnose because a bad breaker or fuse could also cause flickering. You will want to make sure to check all of the connections between the outlets and the wiring.
You can do this by turning off the circuit breaker for the area where you think the issue is located. Once the power is off, you can use a screwdriver to check for loose connections.
You will want to tighten any loose connections with a screwdriver if you notice any loose connections.
You should also use electrical tape to cover any exposed wires to prevent a short circuit.
- Safety First: Before starting, ensure the power is turned off at the breaker panel. Using a voltage tester can confirm that no power is going through the wires.
- Access: Remove any covers or plates to access the wiring. You might need a screwdriver for this.
- Visual Inspection: Look at all of the wires and connections. Loose wires may be visibly disconnected or appear slightly out of place compared to other connections.
- Physical Inspection: Gently touch (but do not tug) each wire with an insulated tool to see if it moves easily, indicating it could be loose.
- Wire Nuts and Connectors: Check wire nuts and connectors as well; they should feel secure and firm when you touch them; if they turn easily or wobble, they might be loose.
- Tightening Connections: If you find any loose connections, use a screwdriver or pliers (depending on what’s appropriate) to tighten them up.
- Re-checking Your Work: After tightening everything, go through again for another visual check.
- Replacing Covers or Plates: Once everything is tightened and in order, replace any removed covers or plates.
Always remember – safety first! If you’re uncomfortable doing these kinds of repairs, don’t hesitate to call a professional electrician.
In Conclusion
Electrical repairs can be daunting, but they don’t have to be.
Following these steps, you can assess your electrical repairs and understand what repairs you need.
If you notice any of the above issues with your wiring, make sure to get them repaired as soon as possible. Waiting to repair the issues could result in a fire.
If you want to learn more about electrical repairs and how to do them yourself, join a DIY repair workshop in your area!
These workshops are great for learning how to do DIY electrical repairs and are a fun way to meet new friends who love DIY repairs!